Deploying ArgoCD on EKS with Terraform and Helm
Prerequisite
Before we proceed and deploy ArgoCDn using Terraform and HELM, there are a few commands or tools you need to have in the server where you will be running the commands from.
1. awscli - aws-cli/2.12.1 Python/3.11.3

2. go version go1.18.9 linux/amd64

3. Terraform v1.5.0

4. kubectl - Client Version: v1.23.17-eks

5. helm - v3.8.0
Assumptions
The following details makes the following assumptions.
You have aws cli credentials configured.

You have created s3 bucket that will act as the backend of the project.
You have setup the EKS cluster as described in this project Setting up EKS Cluster with Terraform, Helm and a Load balancer
Quick Setup
Clone the repository:
git clone https://github.com/Skanyi/terraform-projects.git
Change directory;
cd cicd
Update the backend.tf and update the s3 bucket and the region of your s3 bucket. Update the profile if you are not using the default profile.
Update the variables.tf profile variable if you are not using the default profile.
Update the secret.tfvars file with the output values of the Setting up EKS with Terraform, Helm and a Load balancer
Format the the project.
terraform fmt
Initialize the project to pull all the modules used.
terraform init
Validate that the project is correctly setup.
terraform validate
Run the plan command to see all the resources that will be created.
terraform plan --var-file="secret.tfvars"
When you ready, run the apply command to create the resources.
terraform apply --var-file="secret.tfvars"
Detailed Setup Steps.
When the above setup is done, ArgoCD will be deployed. The following is detailed steps of all the resources created:
-
Namespace - Create a namespace where we are going to deploy ArgoCD server.
resource "kubernetes_namespace" "argocd-namespace" { metadata { annotations = { name = "argocd" } labels = { app = "argocd" } name = "argocd" } } -
Policy - Create a policy that we are going to attache to the role that the ArgoCD is going to use. Currently, we are providing all EC2 permissions. We can update the policy to narrow down to specific permissions.
module "argocd_iam_policy" { source = "terraform-aws-modules/iam/aws//modules/iam-policy" name = "argocd-policy" path = "/" description = "ArgoCD Policy" policy = jsonencode({ Version = "2012-10-17" Statement = [ { Effect = "Allow" Action = ["ec2:*"] Resource = "*" } ] }) } -
Role - Create a role that we are going to annotate the Service Account used by the ArgoCD server with.
module "argocd_role" { source = "terraform-aws-modules/iam/aws//modules/iam-role-for-service-accounts-eks" role_name = "${var.env_name}_eks_argocd" role_policy_arns = { policy = module.argocd_iam_policy.arn } oidc_providers = { main = { provider_arn = var.oidc_provider_arn namespace_service_accounts = ["argocd:argocd-sa"] } } } -
Service Account - Create a service account that the ArgoCD is going to use to get access to different AWS services.
resource "kubernetes_service_account" "service-account" { metadata { name = "argocd-sa" namespace = "argocd" labels = { "app.kubernetes.io/name" = "argocd-sa" } annotations = { "eks.amazonaws.com/role-arn" = module.argocd_role.iam_role_arn "eks.amazonaws.com/sts-regional-endpoints" = "true" } } } -
Deployment - We install ArgoCD using HELM.
resource "helm_release" "argocd" { name = "argocd" repository = "https://argoproj.github.io/argo-helm" chart = "argo-cd" namespace = "argocd" depends_on = [ kubernetes_service_account.service-account ] values = [ "${file("${path.module}/templates/values.yaml")}" ] set { name = "region" value = var.main-region } set { name = "vpcId" value = var.vpc_id } set { name = "serviceAccount.create" value = "false" } set { name = "serviceAccount.name" value = "argocd-sa" } set { name = "clusterName" value = var.cluster_name } } -
When deploying ArgoCD using HELM, I passed the
values.yamlto enable ingress creation that will create a Application load balancer that we use to access ArgoCD.values = [ "${file("${path.module}/templates/values.yaml")}" ]To enable the ingress, we need to have a domain so that we can change the host in the values to a subdomain that we will use to access the application.
 ```
 hosts:
 - argocd.example.com
 ```
Update the DNS record and add a record that send the traffic for the subdomain
argocd.example.comto the ALB created. You can get the address of ArgoCD using the following command.`kubectl get ingress -n argocd`The full file can be found here
cicd/modules/argocd/templates/values.yaml.Get the
adminuser password using the following command:`kubectl -n argocd get secret argocd-initial-admin-secret -o jsonpath="{.data.password}" | base64 -d; echo`Access the ArgoCD application using the host and signin using
adminuser and the password from the above command. -
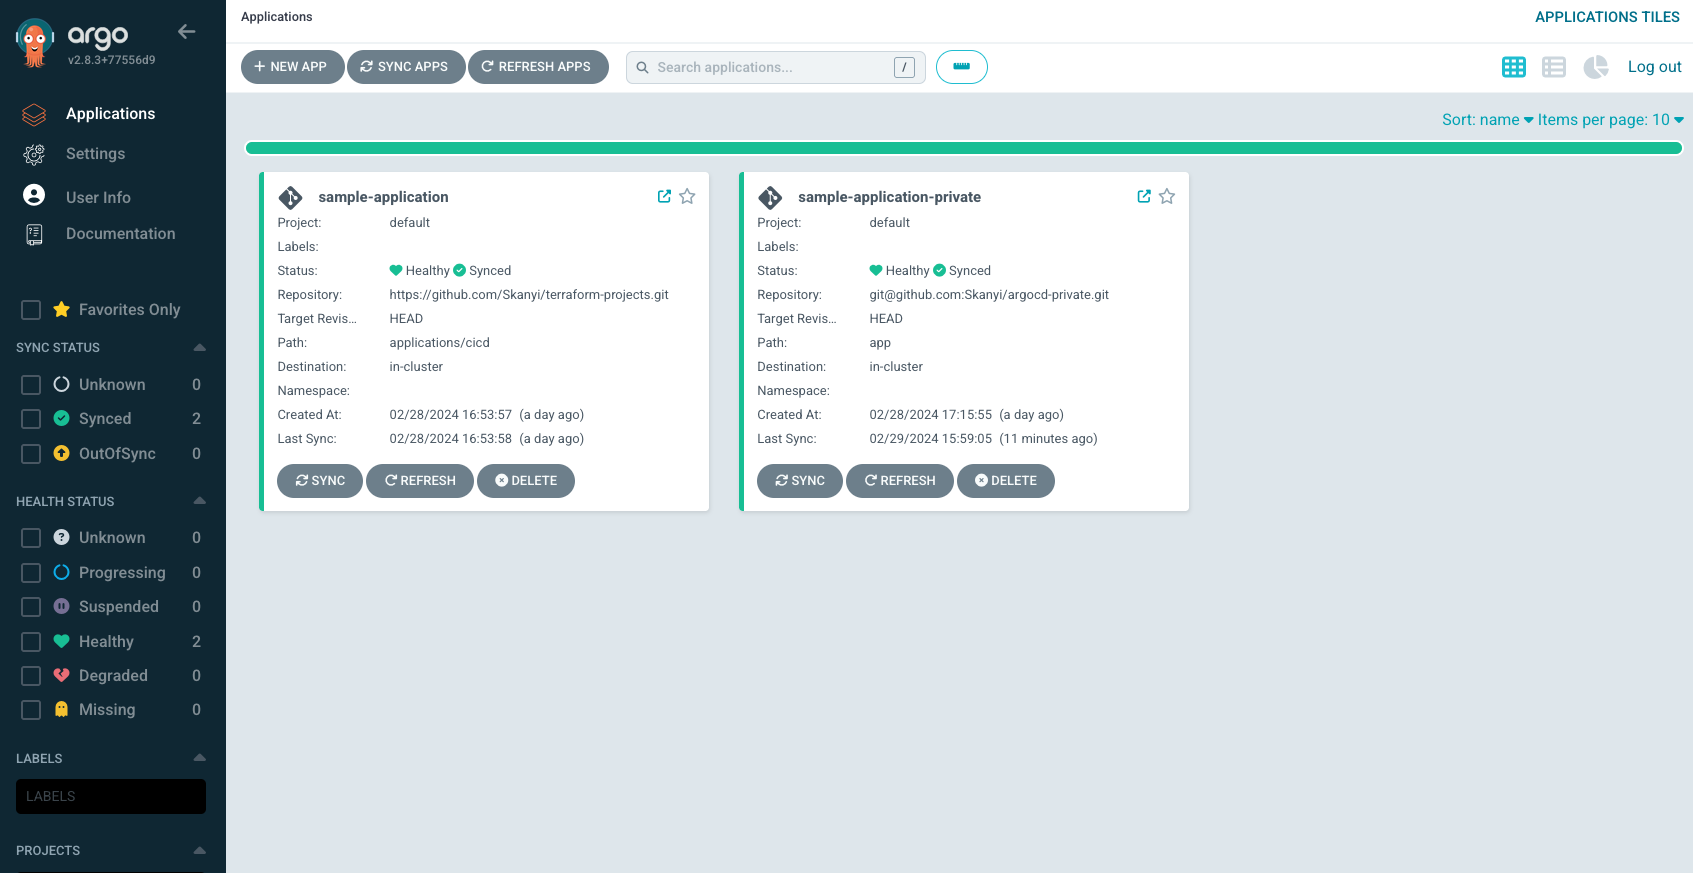
Create Argocd Application.
-
The following example is for public github repository.
kubectl apply -f <sample-application.yaml>apiVersion: argoproj.io/v1alpha1 kind: Application metadata: name: sample-application namespace: argocd finalizers: - resources-finalizer.argocd.argoproj.io spec: project: default source: repoURL: https://github.com/Skanyi/terraform-projects.git targetRevision: HEAD path: applications/cicd destination: server: https://kubernetes.default.svc syncPolicy: automated: prune: true selfHeal: true allowEmpty: false syncOptions: - Validate=true - CreateNamespace=false - PrunePropagationPolicy=foreground - PruneLast=true -
For Private github repository, we need to connect it with the following steps.
-
Create a private repostory on GitHub and have a sample application duplicated there.
-
Connect the GitHub repository with ArgoCD using any method described on Private Repositories.
-
Create the argocd application using the following YAML file.
kubectl apply -f <sample-application-private.yaml>apiVersion: argoproj.io/v1alpha1 kind: Application metadata: name: sample-application-private namespace: argocd finalizers: - resources-finalizer.argocd.argoproj.io spec: project: default source: repoURL: git@github.com:Skanyi/argocd-private.git targetRevision: HEAD path: app destination: server: https://kubernetes.default.svc syncPolicy: automated: prune: true selfHeal: true allowEmpty: false syncOptions: - Validate=true - CreateNamespace=false - PrunePropagationPolicy=foreground - PruneLast=true
-
-
The above YAML files can be found here applications/argocd-apps.
- Change the image of the deployment and observe if argocd deploy new pods for the deployment.

Cleanup the Resources we Created
When we are done testing the setup and don’t require the resources created anymore, we can use the steps below to remove them.
1.1 terraform init

1.2 terraform destroy